
Installation
The official Salesforce B2C Commerce extension, published by Salesforce, is available on the Visual Studio Marketplace and the Open VSX Registry.
Install from your editor
Most of the time you'll install directly from your editor's Extensions view:
- Open the Extensions view (Cmd+Shift+X / Ctrl+Shift+X).
- Search for Salesforce B2C Commerce.
- Pick the extension published by Salesforce and click Install.
- Reload the window when prompted.
The extension's developer, operations, API, and sandbox views appear in the activity bar.
Your editor pulls from the right registry automatically:
- VS Code installs from the Visual Studio Marketplace.
- Cursor, VSCodium, Windsurf, Eclipse Theia, and other VS Code–compatible editors install from the Open VSX Registry.
Each release is published to both registries at the same time, so they stay in sync.
Install from the command line
If you prefer the terminal, use your editor's --install-extension command:
# VS Code (Visual Studio Marketplace)
code --install-extension Salesforce.b2c-vs-extension

# Cursor (Open VSX)
cursor --install-extension salesforce.b2c-vs-extension

# VSCodium / Windsurf / other codium-based editors (Open VSX)
codium --install-extension salesforce.b2c-vs-extension
Install from a VSIX
GitHub Releases also provides a pre-built .vsix for offline or air-gapped installs where neither registry is reachable.
Get the latest build
Latest version: 1.5.2 (released Oct 9, 2026).
Install it
Once you've got the file, install it from the command line or from your editor's Extensions view.
code --install-extension b2c-vs-extension-X.Y.Z.vsixcursor --install-extension b2c-vs-extension-X.Y.Z.vsix1. Open the Extensions view (Cmd+Shift+X / Ctrl+Shift+X)
2. Click the "..." menu in the view header
3. Choose "Install from VSIX..."
4. Pick the file you just downloaded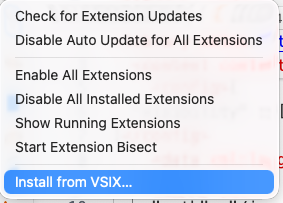
Before you start
A few things to have ready:
- VS Code 1.105 or newer (Cursor, VSCodium, Windsurf, and other VS Code–compatible editors work too — they install from Open VSX).
- Access to a B2C Commerce instance for remote workflows.
- The B2C CLI is optional. Install it when you want to run the same operations from the terminal or CI. See the CLI Installation guide for installation options.
Connect to your sandbox
The extension uses the same connection your CLI already uses, so most of the time there's nothing more to set up. Different features need different credentials though — see Connecting to your sandbox for what each one needs and a copy-paste example.
New here? The Authentication Setup guide walks through getting your credentials in the first place.
Next Steps
- Overview — what the extension can do.
- Connecting to your sandbox — what each feature needs.